DIY eco-friendly Christmas décor and my philosophy behind it
It is the time of the year when most people do their annual Christmas splurge and shopping
It’s the holiday season full of joy, cheer and long Christmas songs playlists. For my family the holiday season kicks off the week before Thanksgiving with the birthday of my eldest daughter. That involves a lot of party planning, birthday shopping and birthday celebrations. After a long and exhausting week of birthday festivities comes the next big holiday – Thanksgiving and black Friday. However, it seems like the right time to dive into some crafty DIY eco-friendly Christmas décor.
I didn’t know anything about it before I came to live in the USA and because I didn’t have family of my own, my parents live far away from me, I never really felt any real connection to this holiday. Now years later I use the long weekend to spend time with my own family and decorate our house for Christmas. I generally avoid shopping on weekends especially the madness on Black Friday.
We all have different spiritual philosophy of life. Mine has always been the one of a creator, not a consumer
I like to live a sustainable life and do my small contribution by minimizing waste, avoid consumption of extra goods, recycle, reuse, upcycle, driving electric car, no disposable products and have an eco-friendly home décor.
This year I probably spent $40 on Christmas décor and I still feel a bit guilty about it because I could have easily upcycled some of the little things, I purchased from Dollar store for my projects. Time was a key factor this year. Participating in One Room Challenge which ended right on my daughter’s Birthday and a week before Thanksgiving, put me on a very tight schedule. Didn’t leave me much room to prepare for my Christmas décor projects so I had to do a lot of improvisations.
Here is what I came up with:
AFTER
BEFORE


1. Christmas Tree
I have a fake Christmas tree that I use many years now. It’s a huge debate whether a real tree or fake is more sustainable. My answer to that – whatever makes you happy! If I repotted and kept one of my cypress trees as indoor/outdoor option would have been a great solution but I decided to plant all 3 of them in my front yard year ago. Of course, now they are taking a prominent spot and will always be big part of Christmas décor. Moreover, you can see them from the window too. This year I’m using pinecones instead of shiny ornaments. Trying to focus on more organic, neutral, minimalistic look and use more natural materials. As a tradition we always buy a couple of new signature ornaments each year. My pick for this Christmas were two owls made of fabric. However, the tree is not going to be the center of attention this season. It will be the following:

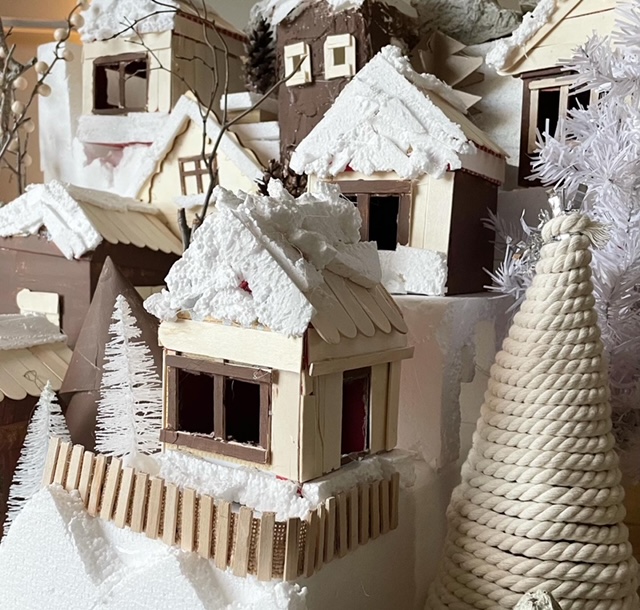
2. DIY Christmas village
This is one of my masterpieces that I’m so proud of. Five years ago, I decided to make and donate “The Manger” for my girl’s catholic school. Recently I found pictures of it and was amazed how I did it. I couldn’t remember most of the things I did, all I remembered was I used cardboard, milk cartons, branches, sticks and scrap. This really inspired me to dig deeper and see what else I can do with stuff from my recycling bin. That’s how the idea of upcycled Christmas village hit me. Took all the Styrofoam I had from my recently purchased fireplace, the cardboard, found some milk cartons, branches, pinecones, graft sticks and purchased a few premade houses from dollar store. Really had the no time to make 6-7 houses from scratch. Yes, guilty of being lazy and not stretching myself all the way but still saving my milk cartons in case I want to add more houses.
The Styrofoam I used for the tiered display of the village and for snow on the roofs of the houses.
Cut out windows and doors in the house boxes, outlined them with craft sticks, covered the roofs with craft sticks too, added some Styrofoam for snow and some paint. Did 7 houses of different size and neutral colors. Made fences to some of them from driftwood or craft sticks. Added upcycled trees of different kinds.

3. Upcycled trees
I used a few different trees options for added texture, dimension, visual appeal and color.
- A) Christmas tree from toilet paper rolls
- B) Christmas tree from cereal box
- C) Christmas trees from pinecones glued on Styrofoam
- D) Reused cones from old Christmas tree and put left over manila rope around them.
- E) Pop corn glued on crunchy rice rolls tree.
- F) Spray–painted a few tree branches of different size with stone textured paint, put them in pots and added some white balls from an artificial plant I had. The tiny ones I used in the village, the big ones I’m using as part of the Christmas décor.
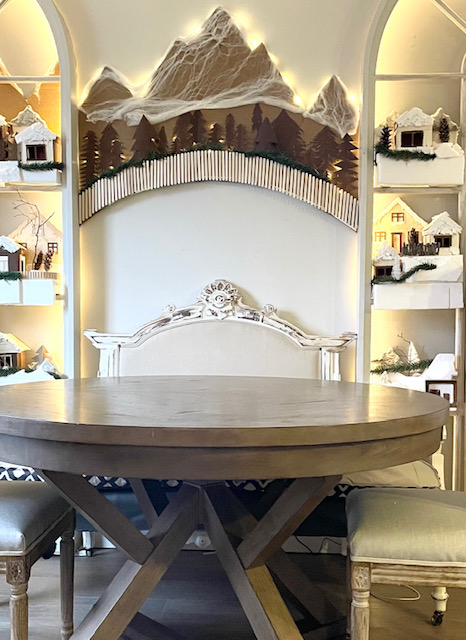
The village was displayed on two big arches I have in my dining room. In the middle I connected them with…

the Mountain Wall Art
The Mountain peaks wall art wasn’t planned but there was something missing in the space between the two displays. I decided to connect both sides of the village with mountains and a bridge wall art. Firstly, I drew the peaks on cardboard and cut them out to size. Needles to say, it was really easy. Had to connect the cardboard pieces together with stapler. Secondly, on the back I did the same using floor mat tiles. This provided a little space from the wall for tape lights. My biggest score in this project was finding some left over spider web from Halloween and dressing up the mountain peaks with it. The result was incredible. I would never think of it if I didn’t randomly see it in the kids toy bin and decided to give it a try.
the Bridge
It would have been much easier to do if the bridge was a straight line however I went for an arched shape. I made my life more complicated just because I wanted to follow the curves of the big arches. Used my favorite craft sticks to cover it in wood and added some Styrofoam for dimension. Finally, I glued on some of the cardboard trees, drew a few more straight on the artwork and pained all in dark brown for contrast. Now I have a really magical, unique, eco-friendly and pocket friendly Christmas décor.


Every time we make something with our own hands, we give it a piece of our heart and energy. This piece become alive and have a lot of stories to tell for many years ahead.
the Aftermath
Besides the fact that DIY upcycling projects save the planet and your money, they help you bond with your family. In all my projects I use my kids as collaborators. The youngest really makes a mess most of the time but I always buy an extra set of everything just for her to practice on her own. The teenager is never interested in arts and crafts but I use the points system to integrate her in DIY activities. Only my middle one is an artist at heart and enjoys it sincerely. It’s not easy to balance different age groups but its healthy for the family to have bonding time and craft their home together. What’s a better opportunity to DIY Christmas décor, than Thanksgiving long weekend, when all kids are looking forward to Christmas presents! Versa when we purchase a new decoration piece from the store, it makes us happy and gives us instant gratification but soon enough becomes that old thing that needs to be replaced.ॐInvesting in long term items, brings us long term happiness. I choose happiness over piling up material possessions.
All rights reserved by Om Décor. © 2021
design by B Positive Studio.